
Block paving rarely gets filthy overnight. It usually creeps up on you – a bit of moss in the joints, darker patches where water sits, tyre marks near the drive, and weeds making the whole area look older than it is. If you are wondering how to restore dirty block paving, the good news is that most paved surfaces can be brought back to a much cleaner, smarter finish with the right approach.
The key is not just blasting the surface and hoping for the best. Done properly, block paving restoration is about cleaning the paving itself, treating the joints carefully, and knowing when a surface needs more than a quick wash. That is what gets you a result that looks noticeably better and lasts longer.
Why block paving gets so dirty
Block paving is designed to be hard-wearing, but it is also full of small gaps, textured surfaces and joints that naturally collect dirt. Over time, algae, moss, lichen and general grime build up, especially in shaded or damp areas. Driveways also pick up oil spots, tyre marks and traffic staining, while patios tend to suffer more from leaf staining and green growth.
The problem is not only appearance. Once moss and weeds establish themselves in the joints, they hold moisture and can loosen the sand that helps keep the blocks stable. Left alone for long enough, paving can start to look patchy, uneven and neglected, even if the blocks themselves are still in decent condition.
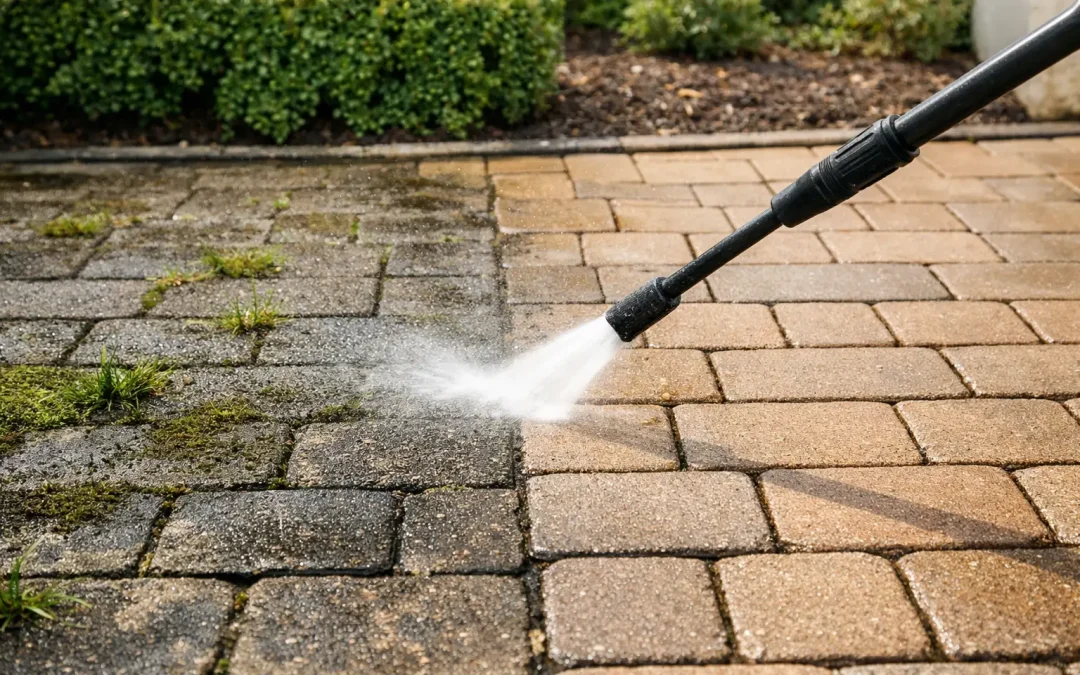
How to restore dirty block paving without causing damage
If you want to restore block paving properly, start with the condition of the surface rather than the dirt alone. Some paving only needs a careful clean and re-sand. Some needs stain treatment. Some older areas may have sunken spots, loose blocks or heavy weed growth that make cleaning only part of the job.
This matters because pressure washing is useful, but it is not risk-free. Too much pressure, the wrong nozzle, or poor technique can strip jointing sand, mark the surface and disturb the blocks. That is why a controlled clean nearly always works better than an aggressive one.
Step 1: Clear the surface first
Before any washing starts, remove loose debris, leaves and surface dirt with a stiff brush. If weeds are growing through the joints, pull out what you can and, where needed, apply an appropriate treatment in advance so roots are dealt with rather than just torn off at the top.
This first stage sounds basic, but it makes the rest of the job more effective. It also gives you a clearer view of stains, damaged joints and any movement in the paving.
Step 2: Pre-treat heavy grime and organic growth
Dark green patches, black spotting and slippery areas usually need more than water alone. A suitable cleaning treatment can help loosen algae, moss and built-up dirt before washing begins. For oil marks or rust staining, a more targeted treatment may be needed.
This is where many DIY jobs fall short. Using the wrong product can bleach the area, affect nearby planting or simply fail to shift the staining. It often depends on what caused the mark in the first place and how long it has been there.
Step 3: Pressure wash with care
A professional clean usually involves pressure washing, but not at maximum force. The aim is to lift dirt from the surface and joints without gouging out the sand bed or damaging the paving face.
Work methodically and keep the spray moving. Angling the lance correctly helps clean the joints without emptying them completely. On older paving or decorative blocks, a gentler setting is often the better choice. A slower, controlled clean can produce a far better finish than a rushed, overly harsh one.
Step 4: Rinse and inspect the true condition
Once the surface dirt is gone, you can see what the paving actually needs. Some areas will come up extremely well straight away. Others may reveal deeper staining, faded patches or joints that have lost significant sand.
That is normal. Cleaning exposes the true state of the paving, and it is often the point where people realise the job is not finished yet.
Re-sanding is part of restoring block paving
One of the most overlooked parts of how to restore dirty block paving is replacing the jointing sand. After cleaning, especially with pressure washing, the joints need to dry properly before fresh kiln-dried sand is brushed back in.
This step matters for both appearance and stability. The sand helps lock the blocks together, reduces movement and limits space for weeds to return. Skip it, and even clean paving can quickly start to look untidy again. In worse cases, movement in the blocks can become more of an issue over time.
You should wait until the surface is fully dry before re-sanding. If the joints are damp, the sand will not flow in properly and you will not get good coverage.
Should you seal block paving afterwards?
Sealing can be worthwhile, but it is not always essential. A good sealer can help reduce staining, slow down weed regrowth and improve the overall look of the paving. Some finishes also enhance colour, which can make older blocks look fresher.
That said, sealing is only worth doing once the paving is thoroughly clean, dry and properly re-sanded. If moisture or dirt is trapped underneath, the finish can look uneven. It is also worth being realistic – sealant helps protect the surface, but it does not make paving maintenance-free.
For a driveway or patio that gets heavy use, sealing can be a sensible extra step. For lightly used areas, regular maintenance may be enough without it.
When DIY works and when professional cleaning is the better option
Light dirt, small patios and routine upkeep are often manageable as a DIY job if you use the right equipment and take your time. For example, if the paving is only mildly dirty and structurally sound, a careful clean followed by re-sanding may be straightforward.
Professional cleaning becomes the better option when the paving is heavily stained, very slippery, covered in moss, or has not been cleaned for years. The same applies if you are dealing with a large driveway, commercial frontage or paving that needs to look presentable quickly. In those cases, better equipment, proper surface assessment and an experienced approach usually make a visible difference.
There is also the question of risk. Poor washing technique can leave lines, disturb joints and create extra work. For landlords, property managers and business premises, that can be a false economy if the surface still looks poor afterwards.
Common mistakes that make block paving look worse
The biggest mistake is using too much pressure. It can feel productive in the moment, but it often strips out jointing sand and can roughen the surface, making it easier for dirt to return.
Another common issue is ignoring weeds and organic growth before washing. If you only remove the visible top growth, it tends to come back quickly. The same goes for skipping re-sanding after cleaning.
People also underestimate how much staining varies. Oil, rust, leaf marks and black spot do not all respond to the same treatment. If one area does not improve after a standard wash, it does not always mean the paving is beyond saving. It may simply need the right product and a different method.
What results should you realistically expect?
Most dirty block paving can be improved dramatically. Colours often look brighter, the whole area appears cleaner and the property benefits from an immediate lift in kerb appeal. On well-laid paving that has only suffered from neglect, the change can be striking.
But realistic expectations matter. Older blocks may still show signs of age, permanent staining is not always fully removable, and badly sunken or damaged paving may need repair work as well as cleaning. Restoration is about getting the best from the surface you have, not pretending years of wear never happened.
That said, even where some marks remain, a proper clean and re-sand can transform how the area looks and feels underfoot.
Keeping restored paving cleaner for longer
Once the paving has been brought back into shape, a little maintenance goes a long way. Regular sweeping helps stop dirt and seeds settling in the joints. Treating weeds early prevents heavier growth. Cleaning up oil drips and organic debris sooner rather than later also reduces long-term staining.
Shaded areas may need more frequent attention because algae and moss return faster where moisture lingers. In parts of Kent where gardens are exposed to damp conditions or overhanging trees, that can make a noticeable difference.
If your paving has become heavily soiled, slippery or patchy, restoring it properly is usually less about one dramatic clean and more about doing each stage well. Clean the surface carefully, deal with the joints properly, and do not rush the finishing steps. That is what brings block paving back to a standard you can feel good about every time you pull onto the drive or step into the garden.